> ## Documentation Index
> Fetch the complete documentation index at: https://docs-staging-chore-teams-api-autoupdate.mintlify.site/llms.txt
> Use this file to discover all available pages before exploring further.

# ユースケース：Formsを使用してプログレッシブプロファイルフォームを構成する

> Forms for Actionsを使用してプログレッシブプロファイルフォームを構成する方法を説明します。

<Card title="始める前に">
  1. 以下のスコープを有効にして、[マシンツーマシンアプリケーション](https://auth0.com/docs/get-started/auth0-overview/create-applications/machine-to-machine-apps)を作成します。

  * `read:users`
  * `update:users`
  * `create:users`
  * `read:users_app_metadata`
  * `update:users_app_metadata`
  * `create:users_app_metadata`

  2. マシンツーマシンアプリケーションの資格情報を使って[Vault接続](/docs/ja-jp/customize/forms/vault)を追加します。
</Card>

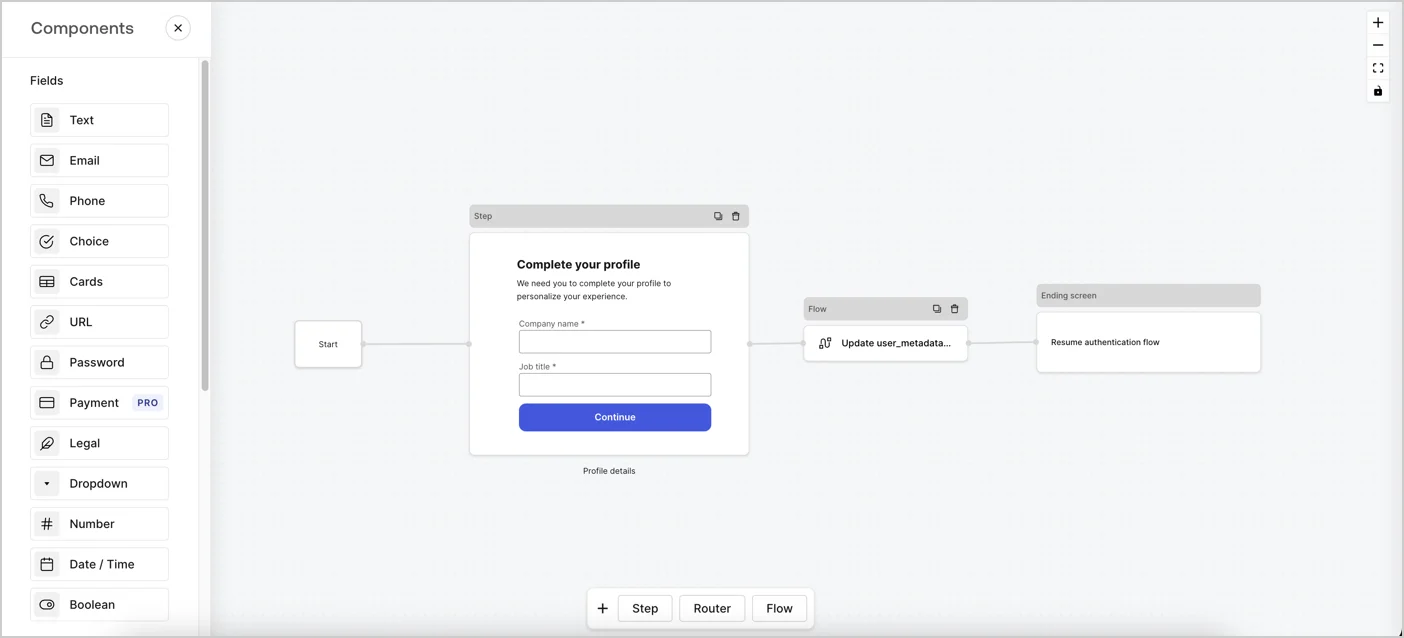
Forms for Actionsを使用すると、プログレッシブプロファイリングフローを作成して、会社名や役職などの不足している情報を収集し、それらを`user_metadata`属性として保管するようユーザーに求めるタイミングを決定できます。
<Frame>
  <img src="https://mintcdn.com/docs-staging-chore-teams-api-autoupdate/j6xHyxRcKa4YjZDf/docs/images/ja-jp/cdy7uua7fh8z/xUx9YmnHvnAqL19JvNtNP/60dae88f893d4ebe8e3523421e960596/Progressive-profle-overview.png?fit=max&auto=format&n=j6xHyxRcKa4YjZDf&q=85&s=74f9b3722b60a7ef81cb98c9e75e1d38" alt="Dashboard > Actions > Forms > Form" data-og-width="1404" width="1404" data-og-height="638" height="638" data-path="docs/images/ja-jp/cdy7uua7fh8z/xUx9YmnHvnAqL19JvNtNP/60dae88f893d4ebe8e3523421e960596/Progressive-profle-overview.png" data-optimize="true" data-opv="3" srcset="https://mintcdn.com/docs-staging-chore-teams-api-autoupdate/j6xHyxRcKa4YjZDf/docs/images/ja-jp/cdy7uua7fh8z/xUx9YmnHvnAqL19JvNtNP/60dae88f893d4ebe8e3523421e960596/Progressive-profle-overview.png?w=280&fit=max&auto=format&n=j6xHyxRcKa4YjZDf&q=85&s=30b40507597853df64f08c8167b38955 280w, https://mintcdn.com/docs-staging-chore-teams-api-autoupdate/j6xHyxRcKa4YjZDf/docs/images/ja-jp/cdy7uua7fh8z/xUx9YmnHvnAqL19JvNtNP/60dae88f893d4ebe8e3523421e960596/Progressive-profle-overview.png?w=560&fit=max&auto=format&n=j6xHyxRcKa4YjZDf&q=85&s=6fb869e8fa264686cfa008a8fb73bad6 560w, https://mintcdn.com/docs-staging-chore-teams-api-autoupdate/j6xHyxRcKa4YjZDf/docs/images/ja-jp/cdy7uua7fh8z/xUx9YmnHvnAqL19JvNtNP/60dae88f893d4ebe8e3523421e960596/Progressive-profle-overview.png?w=840&fit=max&auto=format&n=j6xHyxRcKa4YjZDf&q=85&s=62e2df1151cbc0ad424926cd9c865bda 840w, https://mintcdn.com/docs-staging-chore-teams-api-autoupdate/j6xHyxRcKa4YjZDf/docs/images/ja-jp/cdy7uua7fh8z/xUx9YmnHvnAqL19JvNtNP/60dae88f893d4ebe8e3523421e960596/Progressive-profle-overview.png?w=1100&fit=max&auto=format&n=j6xHyxRcKa4YjZDf&q=85&s=cbe945432ed42004eddcff24f1fb2b09 1100w, https://mintcdn.com/docs-staging-chore-teams-api-autoupdate/j6xHyxRcKa4YjZDf/docs/images/ja-jp/cdy7uua7fh8z/xUx9YmnHvnAqL19JvNtNP/60dae88f893d4ebe8e3523421e960596/Progressive-profle-overview.png?w=1650&fit=max&auto=format&n=j6xHyxRcKa4YjZDf&q=85&s=7fec3c6e0264de3647f457fb59e966e6 1650w, https://mintcdn.com/docs-staging-chore-teams-api-autoupdate/j6xHyxRcKa4YjZDf/docs/images/ja-jp/cdy7uua7fh8z/xUx9YmnHvnAqL19JvNtNP/60dae88f893d4ebe8e3523421e960596/Progressive-profle-overview.png?w=2500&fit=max&auto=format&n=j6xHyxRcKa4YjZDf&q=85&s=019994d1885aa3ff0648d1d6b01f132f 2500w" />
</Frame>

以下のセクションでは、ノードとフローを使用してプログレッシブプロファイルフォームを作成する方法と、フォームを[ログイン後のアクション](/docs/ja-jp/customize/actions/explore-triggers/signup-and-login-triggers/login-trigger)に追加する手順について説明します。

## フォームをゼロから作成する

情報を収集するためのフォームを作成するには、次の手順に従ってください。

1. **［Auth0 Dashboard］>［Actions（アクション）］>［Forms（フォーム）］** の順に選択して、フォームエディターを開きます。
2. **［Create Form（フォームを作成）］** > **［Start from scratch（初めから作成する）］** の順に選択します。

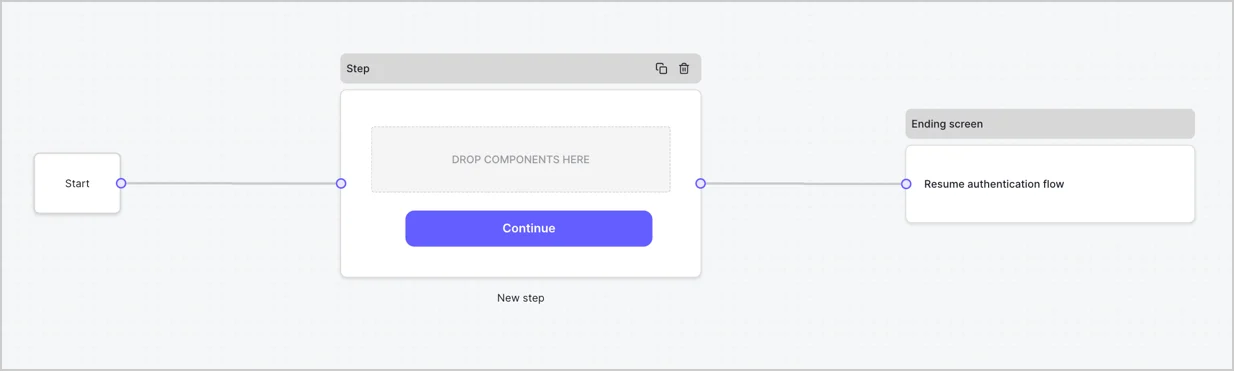
特に設定を変更しない限り、新しいフォームには開始ノード、ステップノード、および終了スクリーンノードが含まれます。
<Frame>
  <img src="https://mintcdn.com/docs-staging-chore-teams-api-autoupdate/VdwDdCo-5NasDlX9/docs/images/ja-jp/cdy7uua7fh8z/2TZ9jSjgEcARFpULI6hz4R/a4319a1bd482f2ee5cc23100fdb2f42c/New-form-Forms-for-action-use-case.png?fit=max&auto=format&n=VdwDdCo-5NasDlX9&q=85&s=dfb83179d6cb70a61fd798107a6ec0cc" alt="Dashboard > Forms > Use Cases > Form" data-og-width="1234" width="1234" data-og-height="371" height="371" data-path="docs/images/ja-jp/cdy7uua7fh8z/2TZ9jSjgEcARFpULI6hz4R/a4319a1bd482f2ee5cc23100fdb2f42c/New-form-Forms-for-action-use-case.png" data-optimize="true" data-opv="3" srcset="https://mintcdn.com/docs-staging-chore-teams-api-autoupdate/VdwDdCo-5NasDlX9/docs/images/ja-jp/cdy7uua7fh8z/2TZ9jSjgEcARFpULI6hz4R/a4319a1bd482f2ee5cc23100fdb2f42c/New-form-Forms-for-action-use-case.png?w=280&fit=max&auto=format&n=VdwDdCo-5NasDlX9&q=85&s=81e82e9d01d48c9d106a4db063ef4f47 280w, https://mintcdn.com/docs-staging-chore-teams-api-autoupdate/VdwDdCo-5NasDlX9/docs/images/ja-jp/cdy7uua7fh8z/2TZ9jSjgEcARFpULI6hz4R/a4319a1bd482f2ee5cc23100fdb2f42c/New-form-Forms-for-action-use-case.png?w=560&fit=max&auto=format&n=VdwDdCo-5NasDlX9&q=85&s=18f41b23160ba6a86910bbab4c375fde 560w, https://mintcdn.com/docs-staging-chore-teams-api-autoupdate/VdwDdCo-5NasDlX9/docs/images/ja-jp/cdy7uua7fh8z/2TZ9jSjgEcARFpULI6hz4R/a4319a1bd482f2ee5cc23100fdb2f42c/New-form-Forms-for-action-use-case.png?w=840&fit=max&auto=format&n=VdwDdCo-5NasDlX9&q=85&s=b332a29c5ef6ca5c862de58e79ec1194 840w, https://mintcdn.com/docs-staging-chore-teams-api-autoupdate/VdwDdCo-5NasDlX9/docs/images/ja-jp/cdy7uua7fh8z/2TZ9jSjgEcARFpULI6hz4R/a4319a1bd482f2ee5cc23100fdb2f42c/New-form-Forms-for-action-use-case.png?w=1100&fit=max&auto=format&n=VdwDdCo-5NasDlX9&q=85&s=255ba3333b9d0c445ace673e5e7c81c4 1100w, https://mintcdn.com/docs-staging-chore-teams-api-autoupdate/VdwDdCo-5NasDlX9/docs/images/ja-jp/cdy7uua7fh8z/2TZ9jSjgEcARFpULI6hz4R/a4319a1bd482f2ee5cc23100fdb2f42c/New-form-Forms-for-action-use-case.png?w=1650&fit=max&auto=format&n=VdwDdCo-5NasDlX9&q=85&s=cba79c796d8839faec64f0b9253b67f8 1650w, https://mintcdn.com/docs-staging-chore-teams-api-autoupdate/VdwDdCo-5NasDlX9/docs/images/ja-jp/cdy7uua7fh8z/2TZ9jSjgEcARFpULI6hz4R/a4319a1bd482f2ee5cc23100fdb2f42c/New-form-Forms-for-action-use-case.png?w=2500&fit=max&auto=format&n=VdwDdCo-5NasDlX9&q=85&s=b49a8a60dbf01d90dfe29d57532f12f4 2500w" />
</Frame>

### ステップノードを構成する

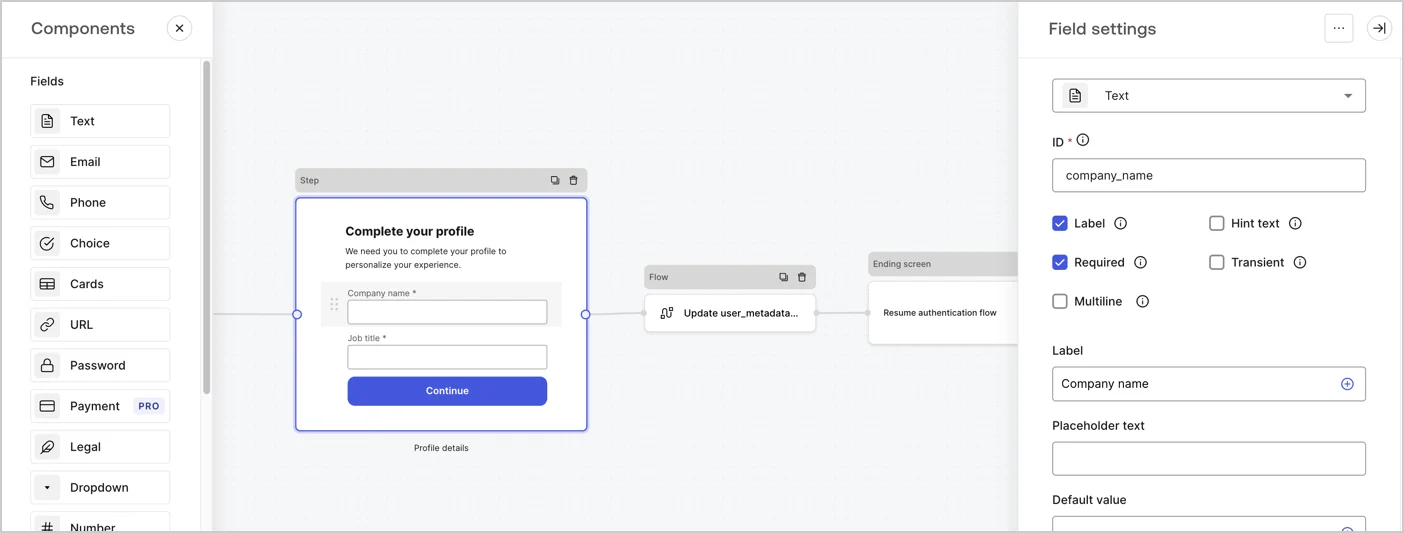
ステップノードはユーザーに表示されるグラフィカルインターフェイスです。次の手順に従って、ステップノードに[フィールド](/docs/ja-jp/customize/forms/nodes-and-components)を追加し、ユーザーの会社名と役職の値を収集します。

1. **［Components menu（コンポーネントメニュー）］** から **［Rich text（リッチテキスト）］** フィールドを **Step（ステップ）** ノードにドラッグします。

   * **Rich text（リッチテキスト）** ：カスタムメッセージを入力します。

     * **例** ：`Complete your profile! We need you to complete your profile to personalize your experience.`（プロファイルの完成！エクスペリエンスをパーソナライズするには、プロファイルを完成させる必要があります。）
   * **［Save（保存）］** を選択します。
2. **Text（テキスト）** フィールドを **Step（ステップ）** ノードにドラッグします。

   * **Id** ：`company_name`を入力します。
   * **Label（ラベル）** ：チェックボックスを有効にします。
   * **Label（ラベル）** ：`Company name`（会社名）を入力します。
   * **Required（必須）** ：チェックボックスを有効にします。
   * **［Save（保存）］** を選択します。
3. **Text（テキスト）** フィールドを **Step（ステップ）** ノードにドラッグします。

   1. **Id** ：`job_title`を入力します。
   2. **Label（ラベル）** ：`Job title`（役職）を入力します。
   3. **Label（ラベル）** ：チェックボックスを有効にします。
   4. **Required（必須）** ：チェックボックスを有効にします。
   5. **［Save（保存）］** を選択します。
4. **［Publish（公開）］** を選択して保存します。

<Frame>
  <img src="https://mintcdn.com/docs-staging-chore-teams-api-autoupdate/WFssd6quFiYXBChd/docs/images/ja-jp/cdy7uua7fh8z/6H1lRzwKyYioQyQJ9MtIoM/aa248e92fc028a68a5b92ff361a11644/progressive-profile-step.png?fit=max&auto=format&n=WFssd6quFiYXBChd&q=85&s=4c6f76972fc3d8e0e79dacb8290694db" alt="Dashboard > Actions > Forms > Form > Step node" data-og-width="1404" width="1404" data-og-height="533" height="533" data-path="docs/images/ja-jp/cdy7uua7fh8z/6H1lRzwKyYioQyQJ9MtIoM/aa248e92fc028a68a5b92ff361a11644/progressive-profile-step.png" data-optimize="true" data-opv="3" srcset="https://mintcdn.com/docs-staging-chore-teams-api-autoupdate/WFssd6quFiYXBChd/docs/images/ja-jp/cdy7uua7fh8z/6H1lRzwKyYioQyQJ9MtIoM/aa248e92fc028a68a5b92ff361a11644/progressive-profile-step.png?w=280&fit=max&auto=format&n=WFssd6quFiYXBChd&q=85&s=5fd702b2264f3b6db7a12fb680cd2d39 280w, https://mintcdn.com/docs-staging-chore-teams-api-autoupdate/WFssd6quFiYXBChd/docs/images/ja-jp/cdy7uua7fh8z/6H1lRzwKyYioQyQJ9MtIoM/aa248e92fc028a68a5b92ff361a11644/progressive-profile-step.png?w=560&fit=max&auto=format&n=WFssd6quFiYXBChd&q=85&s=d5188f2c6d8164eecb8e6c6fefa56412 560w, https://mintcdn.com/docs-staging-chore-teams-api-autoupdate/WFssd6quFiYXBChd/docs/images/ja-jp/cdy7uua7fh8z/6H1lRzwKyYioQyQJ9MtIoM/aa248e92fc028a68a5b92ff361a11644/progressive-profile-step.png?w=840&fit=max&auto=format&n=WFssd6quFiYXBChd&q=85&s=0dbfbc277134743854fecf462ab327f6 840w, https://mintcdn.com/docs-staging-chore-teams-api-autoupdate/WFssd6quFiYXBChd/docs/images/ja-jp/cdy7uua7fh8z/6H1lRzwKyYioQyQJ9MtIoM/aa248e92fc028a68a5b92ff361a11644/progressive-profile-step.png?w=1100&fit=max&auto=format&n=WFssd6quFiYXBChd&q=85&s=0dd578cb91e160fdaa53cd4aeb2fcd9f 1100w, https://mintcdn.com/docs-staging-chore-teams-api-autoupdate/WFssd6quFiYXBChd/docs/images/ja-jp/cdy7uua7fh8z/6H1lRzwKyYioQyQJ9MtIoM/aa248e92fc028a68a5b92ff361a11644/progressive-profile-step.png?w=1650&fit=max&auto=format&n=WFssd6quFiYXBChd&q=85&s=3496b6e30ced6eec8d1469246f26d022 1650w, https://mintcdn.com/docs-staging-chore-teams-api-autoupdate/WFssd6quFiYXBChd/docs/images/ja-jp/cdy7uua7fh8z/6H1lRzwKyYioQyQJ9MtIoM/aa248e92fc028a68a5b92ff361a11644/progressive-profile-step.png?w=2500&fit=max&auto=format&n=WFssd6quFiYXBChd&q=85&s=f2d7f5d2f35de86f9b314f3e8aaed101 2500w" />
</Frame>

### フローノードを構成する

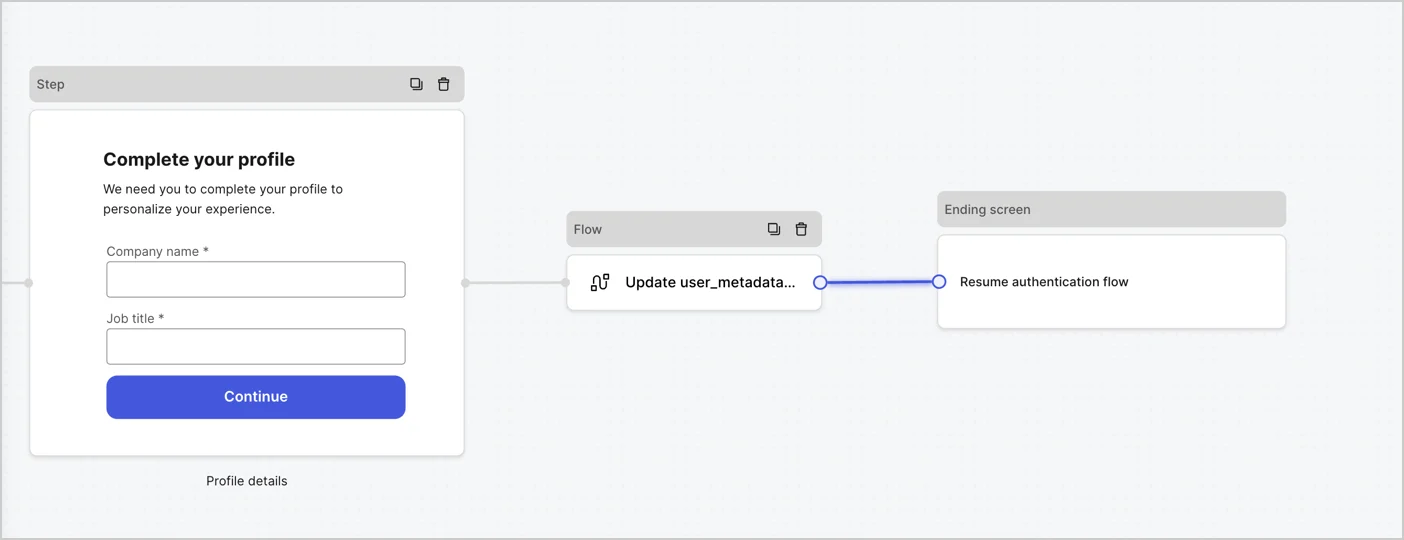
以下の手順に従って、 **Step（ステップ）** ノードの後に​​ **Flow（フロー）** ノードを追加し、`user_metadata`を更新して認証フローを再開します。

1. フォームエディターの下にある **［Flow（フロー）］** を選択します。
2. **Step（ステップ）** ノードと **Ending Screen（終了画面）** ノードの間にある既存のリンクを削除します。
3. 新たに **［Flow（フロー）］** \&gt **［Click to add a flow（クリックしてフローを追加する）］** > **［Create a new flow（新しいフローを作成する）］** を選択します。

   * **［Name（名前）］** フィールドに`Update user_metadata`（user\_metadata更新）と入力します。
   * **［Create（作成）］** を選択します。
   * **［Save（保存）］** を選択します。
4. 下の画像のように **Flow（フロー）** ノードを **Step（ステップ）** ノードと **Ending Screen（終了画面）** ノードにリンクします。
5. **［Publish（公開）］** を選択して保存します。

<Frame>
  <img src="https://mintcdn.com/docs-staging-chore-teams-api-autoupdate/vLiecbHIp4dtIoKM/docs/images/ja-jp/cdy7uua7fh8z/5C91DaWn4LGtJT9BF87ssu/095171d0c452a287c44bfde12fd6d13f/link-nodes.png?fit=max&auto=format&n=vLiecbHIp4dtIoKM&q=85&s=bb42b3c8afa6c96440ba21c7046d6783" alt="Dashboard > Actions > Forms > Form" data-og-width="1404" width="1404" data-og-height="540" height="540" data-path="docs/images/ja-jp/cdy7uua7fh8z/5C91DaWn4LGtJT9BF87ssu/095171d0c452a287c44bfde12fd6d13f/link-nodes.png" data-optimize="true" data-opv="3" srcset="https://mintcdn.com/docs-staging-chore-teams-api-autoupdate/vLiecbHIp4dtIoKM/docs/images/ja-jp/cdy7uua7fh8z/5C91DaWn4LGtJT9BF87ssu/095171d0c452a287c44bfde12fd6d13f/link-nodes.png?w=280&fit=max&auto=format&n=vLiecbHIp4dtIoKM&q=85&s=5a0867ea90f32b089c607c5545ba049c 280w, https://mintcdn.com/docs-staging-chore-teams-api-autoupdate/vLiecbHIp4dtIoKM/docs/images/ja-jp/cdy7uua7fh8z/5C91DaWn4LGtJT9BF87ssu/095171d0c452a287c44bfde12fd6d13f/link-nodes.png?w=560&fit=max&auto=format&n=vLiecbHIp4dtIoKM&q=85&s=434e92c7e8fcac4e287430b879de33f4 560w, https://mintcdn.com/docs-staging-chore-teams-api-autoupdate/vLiecbHIp4dtIoKM/docs/images/ja-jp/cdy7uua7fh8z/5C91DaWn4LGtJT9BF87ssu/095171d0c452a287c44bfde12fd6d13f/link-nodes.png?w=840&fit=max&auto=format&n=vLiecbHIp4dtIoKM&q=85&s=3ce88d383143f28fb9660378cc71c917 840w, https://mintcdn.com/docs-staging-chore-teams-api-autoupdate/vLiecbHIp4dtIoKM/docs/images/ja-jp/cdy7uua7fh8z/5C91DaWn4LGtJT9BF87ssu/095171d0c452a287c44bfde12fd6d13f/link-nodes.png?w=1100&fit=max&auto=format&n=vLiecbHIp4dtIoKM&q=85&s=11bb2bd8a820b2abe7bf4dc630794cdf 1100w, https://mintcdn.com/docs-staging-chore-teams-api-autoupdate/vLiecbHIp4dtIoKM/docs/images/ja-jp/cdy7uua7fh8z/5C91DaWn4LGtJT9BF87ssu/095171d0c452a287c44bfde12fd6d13f/link-nodes.png?w=1650&fit=max&auto=format&n=vLiecbHIp4dtIoKM&q=85&s=01bbf521fa8af11594d21d9ffdbda736 1650w, https://mintcdn.com/docs-staging-chore-teams-api-autoupdate/vLiecbHIp4dtIoKM/docs/images/ja-jp/cdy7uua7fh8z/5C91DaWn4LGtJT9BF87ssu/095171d0c452a287c44bfde12fd6d13f/link-nodes.png?w=2500&fit=max&auto=format&n=vLiecbHIp4dtIoKM&q=85&s=d570a1349af3ef54538f98cc7a59c7d6 2500w" />
</Frame>

Auth0ユーザー更新アクションをフローに追加するには、次の手順に従います。

1. **［Update user\_metadata（user\_metadata更新）］** フローを選択してから **［Edit flow（フローの編集）］** を選択し、新しいタブにフローエディターを開きます。
2. アクションの **［Start（開始）］** の下にある **［+］** アイコンを選択し、 **Update user（ユーザー更新）** アクションを追加します。以下のフィールドに入力して、 **［Save（保存）］** を選択します。

   * **Connection（接続）** ：ドロップダウンからM2MアプリケーションへのVault接続を選択します。

   * **User ID（ユーザーID）** ：`{{context.user.user_id}}`と入力します。

   * **Body（ボディー）** ：以下のコードをコピーして貼り付け、`job_title`と`company_name`のプロパティを含むuser\_metadataを更新します。

     ```json lines theme={null}
      {
         "user_metadata": {
            "job_title": "{{fields.job_title}}",
            "company_name": "{{fields.company_name}}"
         }
      }
     ```

   * **［Save（保存）］** を選択します。
3. **［Publish（公開）］** を選択して保存します。

<Frame>
  <img src="https://mintcdn.com/docs-staging-chore-teams-api-autoupdate/WFssd6quFiYXBChd/docs/images/ja-jp/cdy7uua7fh8z/65Jx4W5oIZJyyvA8z4HqIx/0661b1a8ca6361c54fc4fef07ba59f0b/update-user.png?fit=max&auto=format&n=WFssd6quFiYXBChd&q=85&s=08c34798185d48766294da830b1b8969" alt="Dashboard > Actions > Forms > Flows" data-og-width="1404" width="1404" data-og-height="244" height="244" data-path="docs/images/ja-jp/cdy7uua7fh8z/65Jx4W5oIZJyyvA8z4HqIx/0661b1a8ca6361c54fc4fef07ba59f0b/update-user.png" data-optimize="true" data-opv="3" srcset="https://mintcdn.com/docs-staging-chore-teams-api-autoupdate/WFssd6quFiYXBChd/docs/images/ja-jp/cdy7uua7fh8z/65Jx4W5oIZJyyvA8z4HqIx/0661b1a8ca6361c54fc4fef07ba59f0b/update-user.png?w=280&fit=max&auto=format&n=WFssd6quFiYXBChd&q=85&s=eaf2f306373cd49fb447407f908d28f4 280w, https://mintcdn.com/docs-staging-chore-teams-api-autoupdate/WFssd6quFiYXBChd/docs/images/ja-jp/cdy7uua7fh8z/65Jx4W5oIZJyyvA8z4HqIx/0661b1a8ca6361c54fc4fef07ba59f0b/update-user.png?w=560&fit=max&auto=format&n=WFssd6quFiYXBChd&q=85&s=d6e1cd4c093fc393e0aa0bf08e803a82 560w, https://mintcdn.com/docs-staging-chore-teams-api-autoupdate/WFssd6quFiYXBChd/docs/images/ja-jp/cdy7uua7fh8z/65Jx4W5oIZJyyvA8z4HqIx/0661b1a8ca6361c54fc4fef07ba59f0b/update-user.png?w=840&fit=max&auto=format&n=WFssd6quFiYXBChd&q=85&s=96d5494c918a60c723d8f1d0b944a474 840w, https://mintcdn.com/docs-staging-chore-teams-api-autoupdate/WFssd6quFiYXBChd/docs/images/ja-jp/cdy7uua7fh8z/65Jx4W5oIZJyyvA8z4HqIx/0661b1a8ca6361c54fc4fef07ba59f0b/update-user.png?w=1100&fit=max&auto=format&n=WFssd6quFiYXBChd&q=85&s=2507bd767676ef9bdf16704a622ed70e 1100w, https://mintcdn.com/docs-staging-chore-teams-api-autoupdate/WFssd6quFiYXBChd/docs/images/ja-jp/cdy7uua7fh8z/65Jx4W5oIZJyyvA8z4HqIx/0661b1a8ca6361c54fc4fef07ba59f0b/update-user.png?w=1650&fit=max&auto=format&n=WFssd6quFiYXBChd&q=85&s=eec061efb787d6b87fa034863a2f36a0 1650w, https://mintcdn.com/docs-staging-chore-teams-api-autoupdate/WFssd6quFiYXBChd/docs/images/ja-jp/cdy7uua7fh8z/65Jx4W5oIZJyyvA8z4HqIx/0661b1a8ca6361c54fc4fef07ba59f0b/update-user.png?w=2500&fit=max&auto=format&n=WFssd6quFiYXBChd&q=85&s=f254d2b8284bb7687cc1ca553823cddd 2500w" />
</Frame>

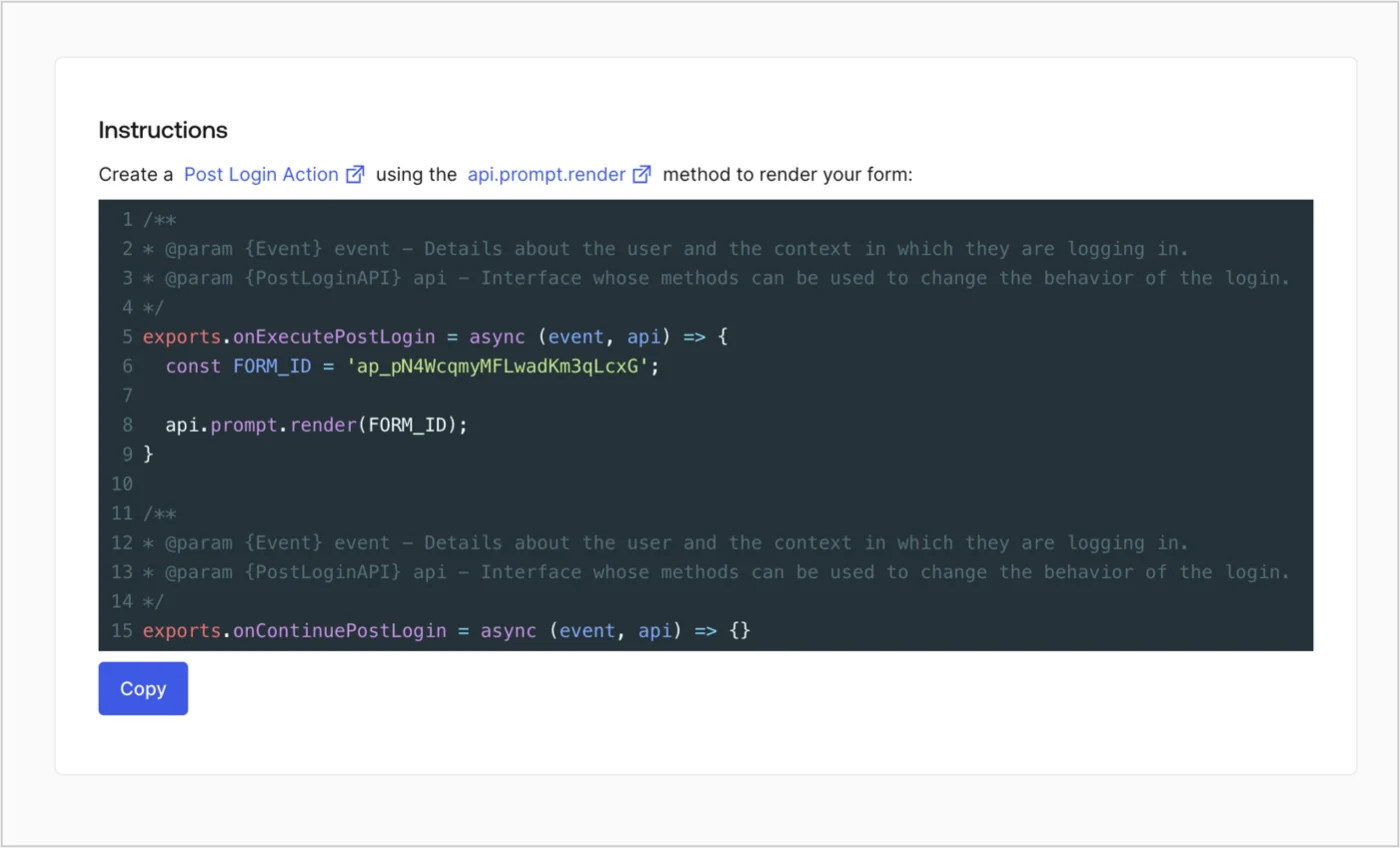
### フォームのレンダーコードを取得する

フォームのレンダーコードを取得して、カスタムのログイン後アクションでフォームを視覚的にレンダリングするには、以下の手順に従います。

* フォームエディターから **［Render（レンダー）］** を選択します。
* **［Copy（コピー）］** を選択します。

<Frame>
  <img src="https://mintcdn.com/docs-staging-chore-teams-api-autoupdate/VdwDdCo-5NasDlX9/docs/images/ja-jp/cdy7uua7fh8z/2EIUzc539sq9lwoTKbjoJv/496a864c0fc44a782c9cadca119dbfb0/embed.png?fit=max&auto=format&n=VdwDdCo-5NasDlX9&q=85&s=15301bacf78c740f0502a10ae5eb1aee" alt="Dashboard > Actions > Forms > Form > Embed" data-og-width="1400" width="1400" data-og-height="848" height="848" data-path="docs/images/ja-jp/cdy7uua7fh8z/2EIUzc539sq9lwoTKbjoJv/496a864c0fc44a782c9cadca119dbfb0/embed.png" data-optimize="true" data-opv="3" srcset="https://mintcdn.com/docs-staging-chore-teams-api-autoupdate/VdwDdCo-5NasDlX9/docs/images/ja-jp/cdy7uua7fh8z/2EIUzc539sq9lwoTKbjoJv/496a864c0fc44a782c9cadca119dbfb0/embed.png?w=280&fit=max&auto=format&n=VdwDdCo-5NasDlX9&q=85&s=69d36b4ada42ff146ace568b0a52ee79 280w, https://mintcdn.com/docs-staging-chore-teams-api-autoupdate/VdwDdCo-5NasDlX9/docs/images/ja-jp/cdy7uua7fh8z/2EIUzc539sq9lwoTKbjoJv/496a864c0fc44a782c9cadca119dbfb0/embed.png?w=560&fit=max&auto=format&n=VdwDdCo-5NasDlX9&q=85&s=db4510103143d8831bee8775ee3e7830 560w, https://mintcdn.com/docs-staging-chore-teams-api-autoupdate/VdwDdCo-5NasDlX9/docs/images/ja-jp/cdy7uua7fh8z/2EIUzc539sq9lwoTKbjoJv/496a864c0fc44a782c9cadca119dbfb0/embed.png?w=840&fit=max&auto=format&n=VdwDdCo-5NasDlX9&q=85&s=caccb858e03e6e0a3753bcd20047c3ad 840w, https://mintcdn.com/docs-staging-chore-teams-api-autoupdate/VdwDdCo-5NasDlX9/docs/images/ja-jp/cdy7uua7fh8z/2EIUzc539sq9lwoTKbjoJv/496a864c0fc44a782c9cadca119dbfb0/embed.png?w=1100&fit=max&auto=format&n=VdwDdCo-5NasDlX9&q=85&s=3799d375f42ad0885a4e1c488e04e50f 1100w, https://mintcdn.com/docs-staging-chore-teams-api-autoupdate/VdwDdCo-5NasDlX9/docs/images/ja-jp/cdy7uua7fh8z/2EIUzc539sq9lwoTKbjoJv/496a864c0fc44a782c9cadca119dbfb0/embed.png?w=1650&fit=max&auto=format&n=VdwDdCo-5NasDlX9&q=85&s=16e881e44e2080772f18c58b40d7f8b4 1650w, https://mintcdn.com/docs-staging-chore-teams-api-autoupdate/VdwDdCo-5NasDlX9/docs/images/ja-jp/cdy7uua7fh8z/2EIUzc539sq9lwoTKbjoJv/496a864c0fc44a782c9cadca119dbfb0/embed.png?w=2500&fit=max&auto=format&n=VdwDdCo-5NasDlX9&q=85&s=d4a8ef77f9d003be0d1aa5562aac5708 2500w" />
</Frame>

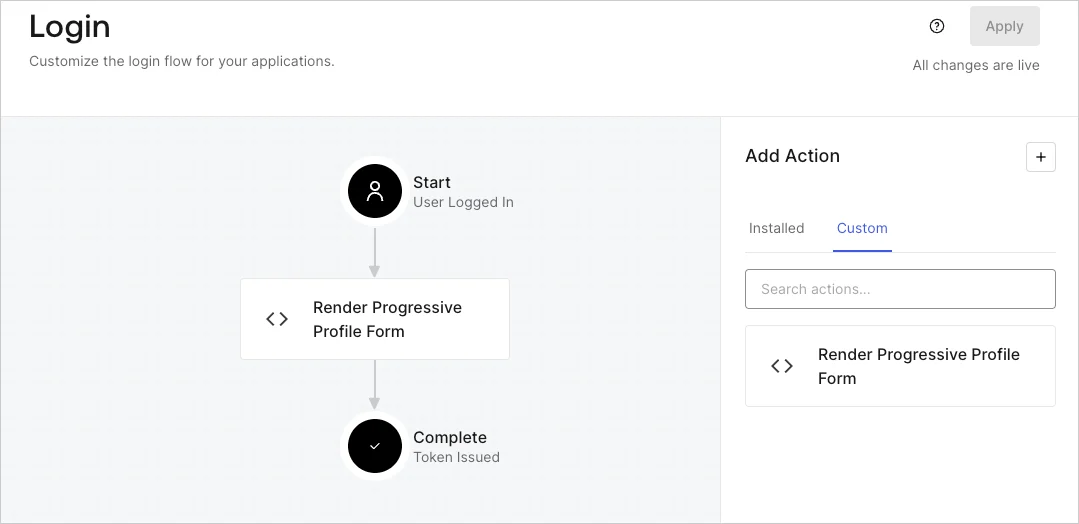
## ログイン後のアクションを作成する

ログイン後のアクションを作成してフォームをレンダリングするには、次の手順に従います。

1. **［Auth0 Dashboard（Auth0ダッシュボード）］>［Actions（アクション）］>［Flows（フロー）］>［Login（ログイン）］** に移動します。
2. **［+］** アイコンを選択し、 **［Build from scratch（初めから構築する）］** を選択します。

   * **Name（名前）** ：`Render Progressive Profile Form`（プログレッシブプロファイルフォームのレンダリング）と入力します。
   * **Trigger（トリガー）** ：［`Login / Post Login`（ログイン/ログイン後）］を選択します。
   * **Runtime（ランタイム）** ：推奨バージョンを選択します。
3. **［Create（作成）］** を選択します。

ログイン後のアクションを構成するには、以下を行います。

1. 既存のコードをコードエディターから削除します。

2. フォームの埋め込みコードをコードエディターに貼り付けます。

3. コードを編集して、フォームをレンダリングする条件ロジックを定義します。

   ```javascript lines theme={null}
   /**
   * @param {Event} event - Details about the user and the context in which they are logging in.
   * @param {PostLoginAPI} api - Interface whose methods can be used to change the behavior of the login.
   */
   exports.onExecutePostLogin = async (event, api) => {
     const FORM_ID = 'REPLACE_WITH_YOUR_FORM_ID';

     if (
       event.stats.logins_count > 2 &&
       !event.user.user_metadata.company_name &&
       !event.user.user_metadata.job_title
     ) {
       api.prompt.render(FORM_ID);
     }
   }

   exports.onContinuePostLogin = async (event, api) => { }
   ```

   <Callout icon="file-lines" color="#0EA5E9" iconType="regular">
     上の例にあるコードでは、ユーザーのログイン回数が3以上で、ユーザーのメタデータにcompany\_nameプロパティとjob\_titleプロパティがない場合にフォームが表示されます。
   </Callout>

4. **［Deploy（デプロイ）］** を選択します。

5. **Render Progressive Profile Form（プログレッシブプロファイルフォームのレンダリング）** アクションを **Login（ログイン）** フローにドラッグ＆ドロップします。

   <Frame>
     <img src="https://mintcdn.com/docs-staging-chore-teams-api-autoupdate/aj5JWOcYdQ7zMkrK/docs/images/ja-jp/cdy7uua7fh8z/1QjjZdpTqTxx012UDN4xk9/99fba5ef4068a5688f1762eea7f42976/renderprogessiveprofile.png?fit=max&auto=format&n=aj5JWOcYdQ7zMkrK&q=85&s=9993e50f522909d81a8086c37c509deb" alt="Dashboard > Forms > Use Cases Progressive Profile Login Action" data-og-width="1079" width="1079" data-og-height="524" height="524" data-path="docs/images/ja-jp/cdy7uua7fh8z/1QjjZdpTqTxx012UDN4xk9/99fba5ef4068a5688f1762eea7f42976/renderprogessiveprofile.png" data-optimize="true" data-opv="3" srcset="https://mintcdn.com/docs-staging-chore-teams-api-autoupdate/aj5JWOcYdQ7zMkrK/docs/images/ja-jp/cdy7uua7fh8z/1QjjZdpTqTxx012UDN4xk9/99fba5ef4068a5688f1762eea7f42976/renderprogessiveprofile.png?w=280&fit=max&auto=format&n=aj5JWOcYdQ7zMkrK&q=85&s=d48107a0b8fb81a9ebeba2785517a8cc 280w, https://mintcdn.com/docs-staging-chore-teams-api-autoupdate/aj5JWOcYdQ7zMkrK/docs/images/ja-jp/cdy7uua7fh8z/1QjjZdpTqTxx012UDN4xk9/99fba5ef4068a5688f1762eea7f42976/renderprogessiveprofile.png?w=560&fit=max&auto=format&n=aj5JWOcYdQ7zMkrK&q=85&s=7f455aaa9872ae67b9e95d7cb77c675f 560w, https://mintcdn.com/docs-staging-chore-teams-api-autoupdate/aj5JWOcYdQ7zMkrK/docs/images/ja-jp/cdy7uua7fh8z/1QjjZdpTqTxx012UDN4xk9/99fba5ef4068a5688f1762eea7f42976/renderprogessiveprofile.png?w=840&fit=max&auto=format&n=aj5JWOcYdQ7zMkrK&q=85&s=3c2f3ad4087532385898a1465b7447a6 840w, https://mintcdn.com/docs-staging-chore-teams-api-autoupdate/aj5JWOcYdQ7zMkrK/docs/images/ja-jp/cdy7uua7fh8z/1QjjZdpTqTxx012UDN4xk9/99fba5ef4068a5688f1762eea7f42976/renderprogessiveprofile.png?w=1100&fit=max&auto=format&n=aj5JWOcYdQ7zMkrK&q=85&s=dc0380431432eb9b6fc4e97973484ea1 1100w, https://mintcdn.com/docs-staging-chore-teams-api-autoupdate/aj5JWOcYdQ7zMkrK/docs/images/ja-jp/cdy7uua7fh8z/1QjjZdpTqTxx012UDN4xk9/99fba5ef4068a5688f1762eea7f42976/renderprogessiveprofile.png?w=1650&fit=max&auto=format&n=aj5JWOcYdQ7zMkrK&q=85&s=0b83a4e91b50436b59590c9fc7a42658 1650w, https://mintcdn.com/docs-staging-chore-teams-api-autoupdate/aj5JWOcYdQ7zMkrK/docs/images/ja-jp/cdy7uua7fh8z/1QjjZdpTqTxx012UDN4xk9/99fba5ef4068a5688f1762eea7f42976/renderprogessiveprofile.png?w=2500&fit=max&auto=format&n=aj5JWOcYdQ7zMkrK&q=85&s=ee0fc652f4dbaeea26c769cf4b2407eb 2500w" />
   </Frame>

6. **［Apply（適用）］** を選択します。

### 実装をテストする

次の手順に従って実装をテストします。

1. ログインを3回以上実行済みで、`user_metadata`属性の`company_name`と`job_title`に値がない既存のユーザーでログインします。
2. ログインフローのログイン後アクションがフォームをレンダリングして、情報の入力を求めます。
3. **［Auth0 Dashboard］>［User Management（ユーザー管理）］>［Users（ユーザー）］** に移動し、ユーザーを見つけて、`user_metadata`属性の`company_name`と`job_title`に情報が含まれていることを確認します。